Tuesday, December 28, 2010

How to BLING my shoes?

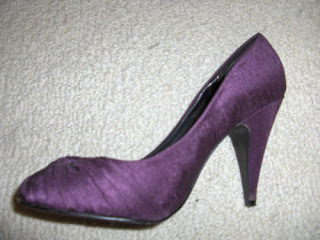
Exhibit A: My purple Rocketdog pumps


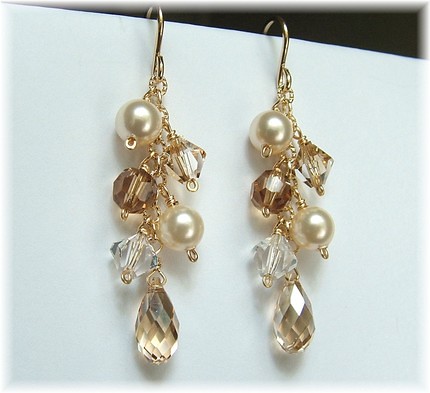
Exhibit B: The clip-on earrings that I found for about $3, and proceeded to break off the clip part.


The problem: How to fix these clips on to the shoe -- preferably in a non-permanent manner.

I'm wondering if I can buy a metal shoe clip and adhere these to it. I found a seller on eBay that sells a plain shoe clip, but can't seem to find anything else.

Beadinmama's Listing

Any ideas, anyone?


Tuesday, December 14, 2010

Saving $$$ on Photography

We REALLY lucked out with both our engagement photos and finding a wedding photographer. I was starting to look at photography packages and was so disappointed in the outrageous costs. I get it: you've got to hire someone good who will listen to what you want, do what you want, and will produce photos of your special day that are more than you ever expected -- after all, this day is only supposed to happen once in your life. But there's got to be a way to combine those things with a cost you can afford to live with, right?

If you are really stuck, contact a local college or university (heck, even a high school) for a budding photographer who can give you what you want for the price you need. I know that my old high school art teacher occassionally photographed weddings for people he knew, and they were beautiful. I was about to go this route when I started asking around, and....I lucked out!

I met someone who was a stay-at-home mom who had just started her own photography business on the side. She charged us $30 for the session fee for our engagement pics and then a simple $4 fee per photo for complete rights. She gave me those photos on a disc in a high-resolution format so that I could make large prints if I wanted. It was exactly what we wanted -- we didn't want anything too fancy, but we were super impressed with her work. She's no longer working for her own business (keep reading). These are some of my favorite engagement photos:

The bad news (for us, good for her) was that she got hired by a larger photography company in the area as an assistant. I was going to go ahead and book the company until I found out that the pricing packages started at $3,000. There's no way we'd meet our $10,000 budget with those prices, no matter how much I love their photography. I had to regretfully say good-bye to our newfound photographer.

One day a few weeks later, an old friend popped up on Facebook. I remembered that he's a photographer in Minneapolis, which is four hours from our wedding location. I went out on a limb and asked him if he'd be willing to shoot our wedding. He was pumped! I was pumped!

Not only have I always loved his photography style, but he offered up his friends and family package. He will bring an assistant with him, which means TWO photographers. He's including a "fauxtobooth" -- a simple black background where our guests can take as many shots as they want for us to have as a keepsake. They'll be available for download by us or our guests after the wedding. (I'm going to gather some costumes/props for this area to make it really fun for our guests.)

Wedding. Photo. Heaven.

You can check him out at http://www.kylesmithphoto.com/!


Friday, December 10, 2010

Purple Bridal Shoes

Since I saw my inspiration photo of the bride with the purple shoes and bouquet, I've been on the hunt for the perfect purple pumps. I found some awesome shoes but they were either too costly (I wanted to stay under $50) or they seemed like they'd KILL my feet after only minutes wearing them.

My friends suggested that I find a pair I love in a dyeable brand and then get them colored how I want. I was about to make up my mind that I would do just that, when I searched eBay one last time.

I found these Rocketdog pumps:


EXACTLY what I'd been looking for! The best part was that I won the bid at $4 and spent $5 for shipping. For 9 dollars, I was willing to take the risk that these shoes wouldn't fit or wouldn't be everything I'd hoped for. I would never have bought these if they had been in the $30-range.

When I finally saw the package at my doorstep I tore right in and tried them on immediately. It was heaven. I pranced around the house in my purple shoes and 5-month pregnant belly the whole night. Jeff was a bit clueless when I exclaimed, "They're my WEDDING shoes!" He said, "Aren't they um....the wrong color?" he whispered, as if he was going to burst my happiness bubble. Absolutely not! was my explaination, to which he just shrugged.

Now I have a bit of a DIY dilemma. I love these shoes the way they are...BUT I think it'd be adorable to bling them up, like what some of  these WeddingBee members did. I don't think I would ever put rhinestones on the entire shoe, but I'm considering doing a design on the toe.

My other option could be a shoe clip. I'd like to make my own...but I'm not sure it'd work on this type of shoe. Any suggestions?


Wednesday, December 8, 2010

Tutorial: Cascade Earrings

 DIY Cascade Earring Tutorial


Supplies
Chain, Swarovski 4mm crystals in dark purple, gray 6mm pearl beads, and standard headpins
I also used sterling silver earring findings that I already had in my jewelry-making box, plus three tools (pliers, snips/wire cutter, and round-nose pliers).


Instructions
1. Put a crystal bead on a headpin.

2. Holding the bead between my index finger and my thumb, I used my thumb nail to manually bend the wire to one side.

3. Using round-nose pliers, pinch the wire at the bend, and wind the wire around the nose to make a loop.


4. Cut the excess wire off and you are left with a loop. Don't worry about closing the loop yet. Also, don't worry if your loop looks funny (this one was actually the prettiest loop I've ever made...the rest are not this pretty!). I also realized at this point that I should have purchased shorter headpins so there would be less waste.


5. Repeat this process for the remaining beads you need. I used 11 crystal beads and 6 pearls (per earring).

6. Cut approximately 1 inch of wire. I have 13 links of chain on mine. (Your first try you may want to add more chain -- you can cut it off later.) Attach the earring finding to the end of the chain.

7. On the first chain link closest to the finding, put the first pearl on. Close the loop with the pliers.

8. Attach a crystal loop to the same loop that holds the pearl. (On the first chain link you now have two beads, one pearl and one crystal.)

9. On the next chain link, attach a crystal loop.

10. Repeat down the chain. I drew up a VERY CRUDE version of my pattern.

11. Make the final pearl be on a chain link by itself. Then space out two chain links before you add the final bead. I did this because I wanted it to create an upside-down teardrop effect, and also because the crystals are smaller than the pearls. The final crystal was getting lost in the pearl if I didn't do that.


12. Done!

Total Time Per Earring:
About 25 minutes. I know that is almost an hour per pair...which seems long. That's how long it's taking me right now and I'm hoping to become a master at this and pare it down to 15-20 minutes. But I think it's worth it!


Suggestions:
I'd recommend purchasing full-size jewelry tools as opposed to the mini-tools they sell. The mini tools are great for small projects but they can really hurt your hands when you are doing projects as detailed as this.
You could also use a variety of beads. I think if I were to start over I might use a clear Swarovski crystal. You can also use a variety of sizes. I've seen some that use larger beads at the top and smaller beads towards the bottom (or reverse). Also, you could use a pretty bead cap on the end of the pearls to add more detail.


50 Cent Bridesmaid Earrings

My goal in making my bridesmaid's earrings was first to make something that most of them would wear again. I fell in love with cascade-style earrings like these:

 
Pearl Cascade Earrings 

 
I've made earrings before but never this intricate of a style. I did a quick search on how to make cascade earrings and found these instructions. The methods used were ones that I've used in other jewelry-making endeavors so I wasn't scared.

 
Here's the breakdown of the costs and where I found my materials:
  • 72" chain purchased at Michaels for $2.99
  • 190 gray Crystazzi 6mm pearls at Michaels for $2.50 (on sale)
  • 400 dark purple Swarovski crystals on eBay for $5.00 (including shipping)
  • Sterling silver earring findings: I already had these in my jewelry-making kit
  • Tools: I already had these as well!
Total Cost of Materials: $10.49

 
Now let's do some more math. I like to figure out exact costs so I know how much I really saved. Also, I will probably end up using the crystals and pearls in other projects (thinking of the crystals for my tree-branch centerpieces and for bouquet jewels).
  • Chain- using 12 inches (2 inches per girl/1 inch per earring) = $0.50 total
  • Gray Pearls - using 72 total (12 per girl/6 per earring) = $0.94 total
  • Swarovski beads - using 132 beads (22 per girl/11 per earring) = $1.65 total
  • Sterling silver earring findings: free!
  • Tools: free!


Actual cost (that I forked over) for ALL bridesmaid earrings = $3.09
Actual cost for each bridesmaid/each pair of earrings = $0.52

 
WOW! Seriously? It costs me about 50 cents a girl? I guess I could have used more expensive materials, but really they look lovely the way they are!

 
See my next blog for the complete tutorial on how I made these earrings.

Monday, December 6, 2010

Letting My Bridesmaids Choose Their Own Dresses

After deciding that my bridesmaids would wear eggplant/deep purple, I was on the hunt for a dress that would compliment them all. I spent weeks emailing my bridesmaids (i.e. being bridezilla) about this dress or that dress. My sister (maid of honor) was the only one kind enough to really respond to most of the crazy emails and ideas. Everyone else just said, "Whatever you want! You're the bride!"

But that's not the response I wanted! I don't want to be the only one responsible for picking out a dress for 6 other people to wear! Of course I wanted them to save money as well.

Then I thought I'd decided on the dress that would flatter each figure. I was excited about the $135 price tag (if bought online) as well. It is Impression Bridesmaids style 1731, pictured here on the right:

BestBridalPrices.com

But then my wheels started turning...I just can't get them to stop sometimes. I thought about my two large-chested bridesmaids and how they would probably loathe wearing a strapless dress. I thought about how different my 4'10" bridesmaid would look next to my 5'9" bridesmaid. I thought about how I'm not even wearing a strapless dress, so why should I make my bridesmaids do the same?

So I settled on a new idea: My bridesmaids would all wear the same color and fabric and have dresses of the same floor-length, but I would let them choose their own dress. I chose Alfred Angelo's brand (because it is widely available for my bridesmaids to try on across the country) and I asked that they each pick out two of their favorites so that I could make the final decision once I see them all.

Four of my girls have picked their dresses so far -- only two more to go! Here's what my wedding party looks like so far (all photos courtesy of AlfredAngelo.com):